Automate Watermarks in Photoshop With Actions for Batches
You need the same watermark steps on file after file, and clicking through every dialog is not sustainable. Photoshop Actions can record placement, opacity, and export once, then replay through File, Automate, Batch, but that only works when your images behave the same way.
If you already rely on Actions for other edits, you may also want watermarking to plug into the same pipeline without turning into a fragile script. Watermark 3 is one option that keeps watermarking in a dedicated panel while still letting you run Photoshop Actions at the right moment, which the sections below unpack in order.
Automate Watermarks With Photoshop Actions: What to Record
A solid Photoshop watermark action usually includes:
- opening or assuming the image is active
- placing text or a smart object logo
- setting opacity and blend mode
- moving the mark to a corner or safe area
- optional flattening or saving for a specific export
When you record, turn off dialog pauses where you would normally choose fonts or paths by hand, unless you want the batch to stop every time. If you need to pick a font once, record that step, then stop recording before you save the action set so future runs use the same typography.
If your watermark is a logo, place it from a fixed path so the action always finds the file. For text, prefer typed content that does not change between files, or accept that per-image text needs a different workflow.
Run Watermark Actions on Many Files With Batch
To automate watermarks across a folder, use File, Automate, Batch. Pick the action set and the action you recorded, then:
- choose Folder as the source and point at the images you want
- set Override Action Open Commands only if your action opens files itself
- decide whether to Suppress File Open Options Dialogs and Suppress Color Profile Warnings so long runs do not stop for prompts
If the action ends with a Save or Export step, match the destination to Folder or Save and Close depending on whether you want new files or overwrites. Overwriting is risky for production archives, so a dedicated output folder is usually safer.
Where Photoshop Actions Break for Watermarking
Actions repeat recorded pixel coordinates and relative scale. That is fine when every image shares the same canvas size and orientation. It becomes painful when:
- landscape and portrait files mix in one batch
- exports target different pixel dimensions
- the subject sits near your usual corner position
- you sometimes need text and sometimes a logo
In those cases, a single action does not adapt. You either maintain multiple actions or spend time fixing odd placements after the fact.
A logo watermark style that works well when placement rules stay consistent across files. Example with Watermark 3.
Chain Actions With Watermarking Inside Photoshop
When you want sharpening, resizing, or a recorded cleanup before or after the mark, you can combine automation with a watermark-focused tool.
The plugin includes a single-image path where you can play a Photoshop Action before or after the watermark runs, alongside resize and sharpen controls. That keeps the watermark itself in a dedicated UI while your existing Action still handles the steps you already trust.
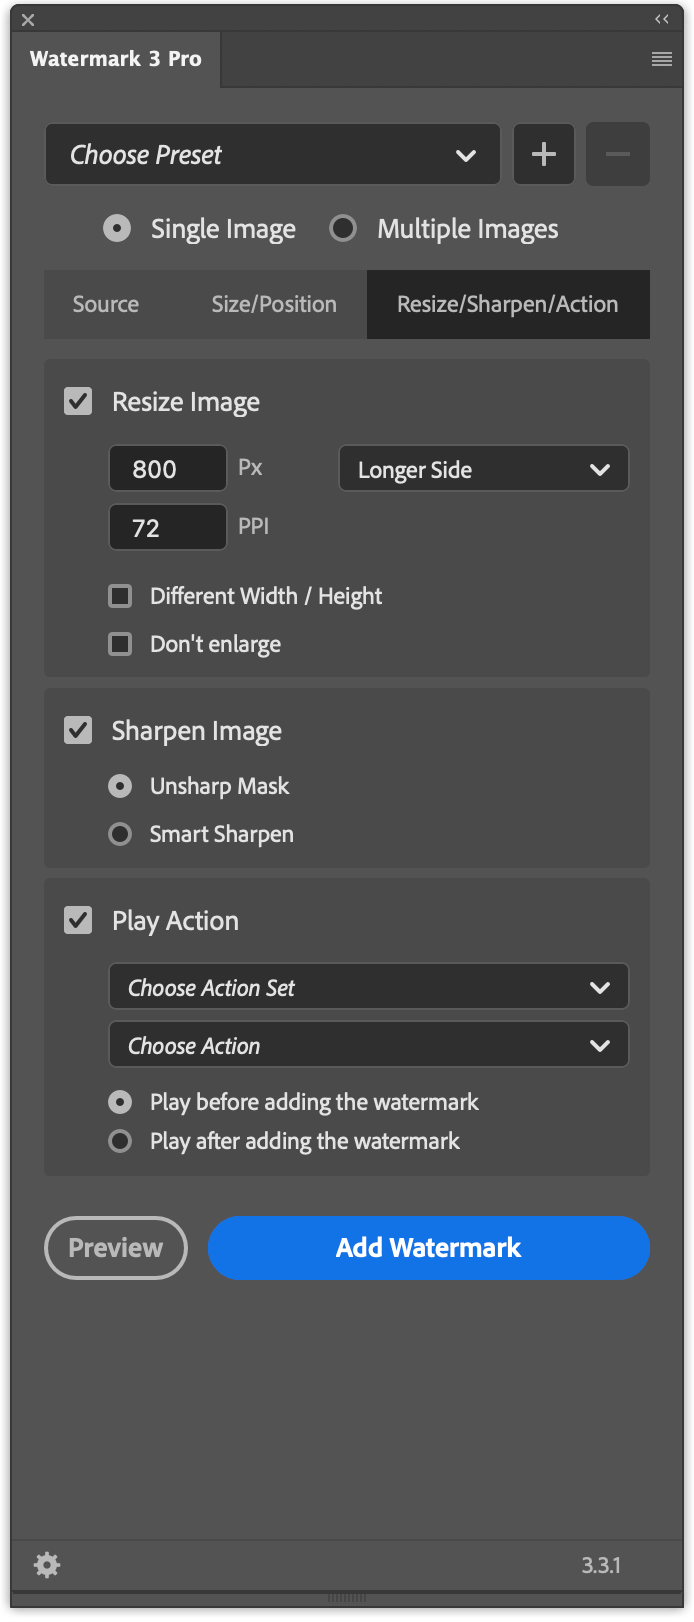
Resize, sharpen, and optional Play Action timing on the plugin single-image workflow.
That Pro feature is useful when you do not want to merge every watermark into one giant Action, but you still need predictable order: for example, noise reduction before the mark, or a color pass after it.
Practical Workflow Choices
Use this simple decision tree:
- Uniform image sets (same size, same orientation): a recorded Actions workflow plus Batch is often enough.
- Mixed galleries or changing crops: prefer dedicated watermark controls or split the job into batches by orientation.
- Watermark plus trusted Action steps: combine watermarking in the plugin with Play Action before or after, or keep Actions for preprocessing and add the mark in the plugin afterward.
If you want text and logo watermarks, batch folders, and optional Action hooks without rebuilding automation every time the job changes, see the download and feature overview on the Watermark 3 Photoshop plugin page.